1. Super
- super vs this
this : 멤버 필드와 일반 변수(매개 변수)를 구분할 때 사용.
this() : 한 생성자가 다른 생성자를 호출할 때 사용.
this는 같은 인스턴스(클래스) 안에서 활용.
- super.변수명
부모클래스의 멤버와 자손 클래스의 멤버를 구분하기 위해 사용.
- super()
부모클래스의 생성자 호출을 위해 사용.
자손클래스의 생성자에서는 부모클래스의 생성자를
호출해서 먼저 처리되도록 해야 함.(첫번째 줄에 작성)
부모클래스에 여러 개의 생성자가 존재할 경우(오버로딩)
생성자의 매개변수로 구분하여 사용.
super vs this 사용 예시)
import package1.A;

public class SuperTest {

	public static void main(String[] args) {
		Child c = new Child();
		c.method();
	}

}

class Parent{
	int x = 10;
	int y = 100;

}

class Child extends Parent{
	int x = 20;
	int z = 300;

	void method() {
		System.out.println("x: " + x);
		System.out.println("this.x: " + this.x);//위 출력문과 동일하지만 동일한 인스턴스 안에 있는 인스턴스 변수라는 표시로 this 표시해줌
		System.out.println("super.x: " + super.x);//부모 클래스에 있는 동일한 이름의 변수라면 super표시해줌.
		//y, z처럼 변수명이 겹치지 않는다면 굳이 표시해줄 필요 없음.
	}
}
부모 클래스에 있는 동일한 이름의 변수라면 super표시해줘야함.
class Parent{
	int x = 10;
	int y = 100;

	String getLocation() {
		return "x: " + x + ", y: " + y;
	}
}

class Child extends Parent{
	int x = 20;
	int z = 300;

	void method() {
		System.out.println("x: " + x);
		System.out.println("this.x: " + this.x);//위 출력문과 동일하지만 동일한 인스턴스 안에 있는 인스턴스 변수라는 표시로 this 표시해줌
		System.out.println("super.x: " + super.x);//부모 클래스에 있는 동일한 이름의 변수라면 super표시해줌.
		//y, z처럼 변수명이 겹치지 않는다면 굳이 표시해줄 필요 없음.
	}

	@Override//부모클래스의 메소드가 없어진 것이 아니라 해당 클래스에서 잠시 덮어두고 수정하여서 이용하는 것
	String getLocation() {
		return super.getLocation() + "this.x: " + this.x + ", z: " + z;
	}

}
부모클래스 생성자 생성 방법 1 - 기본 생성자 이용
//super() 부모 클래스의 생성자
class Ancestor{//조상
	int x;
	int y;

	//기본생성자 : public Ancestor() { }
	public Ancestor() { };
}

class Descendants extends Ancestor {//자손
	int z;

	public Descendants(int x, int y, int z) {
	super();//부모클래스의 기본 생성자 사용
		this.x = x;
		this.y = y;
	}
}
부모클래스 생성자 생성 방법 2 - 부모 클래스의 해당 생성자 사용(매개변수를 가진 생성자 생성시 기본생성자 생기지 않기 때문에 기본생성자를 사용할 수 없다!)
//super() 부모 클래스의 생성자
class Ancestor{//조상
	int x;
	int y;

	//기본생성자 : public Ancestor() { }

	public Ancestor(int x, int y) {
		this.x = x;
		this.y = y;
	}
}

class Descendants extends Ancestor {//자손
	int z;

	public Descendants(int x, int y, int z) {
	super(x,y);//부모 클래스의 해당 생성자 사용
		this.z = z;
	}
}
생성자들의 실행 순서 (Object - Super 순으로)
class AA{
	public AA() {
		//super(); 가 존재함 - 여기에는 Object의 생성자가 호출됨 (Object 클래스에 대한 super가 만들어져서 기본 생성자 만들어짐)
		System.out.println("생성자 AA");
	}
}

class BB extends AA{
	public BB() {
		//super(); 가 존재함 - 부모생성자 호출이 생략 되어 보이더라도 컴파일러 입장에서는 부모생성자를 생성하는 호출 명령어가 가장 먼저(맨 윗줄에) 실행됨.
		System.out.println("생성자 BB");
	}
}

class CC extends BB{
	public CC() {
		System.out.println("생성자 CC");
	}
}
2. 다형성
- 하나의 참조변수로 여러 클래스의 인스턴스를 저장하는 것.
- 상속관계에서만 저장이 가능하며, 부모클래스의 참조변수로 자식클래스의 인스턴스를 저장할 수 있음.
3. 객체의 업캐스팅(Up_casting)과 다운캐스팅(Down_casting)
- 업캐스팅 : 부모클래스의 참조변수에 자손 클래스의 인스턴스를 저장.
- 다운캐스팅 : 부모클래스의 참조변수에 저장된 자손클래스의 인스턴스를 원래 자손 클래스의 참조변수에 복원.
업캐스팅 된 인스턴스에서 부모에게 상속받은 메소드는 실행될 수 있지만 자식클래스 안에 있는 메소드는 부모클래스 입장에선 수행할 수 없기 때문에 다운캐스팅한 후 메소드를 수행한다.
package polymorphism;

public class PolyTest {

	public static void main(String[] args) {
		FireEngine fe = new FireEngine();
		Ambulance ab = new Ambulance();

		Car c1 = fe;//업캐스팅
		Car c2 = ab;//업캐스팅

		c1.drive();
		c1.stop();

//		c1.water();//부모입장에서 자식의 맴버가 없는 것으로 처리.

		FireEngine fe2 = (FireEngine)c1;//다운 캐스팅
		fe2.water();
		}


//자동차라는 것들은...
class Car{
	String color;
	int door;

	void drive() {
		System.out.println("간다~~~");
	}

	void stop() {
		System.out.println("멈춘다!!");
	}
}

//소방차는...
class FireEngine extends Car{
	void water() {
		System.out.println("물뿌리네~");
	}
}

//구급차는...
class Ambulance extends Car{
	void firstAid() {
		System.out.println("사람을 살리네!");
	}
}
- instanceof : 업캐스팅된 인스턴스가 어떤 클래스로 만들어져 있는지를 판별하기 위한 명령.
업캐스팅된 인스턴스를 배열에 넣고 area 메소드에서 순차적으로 instanceof로 업캐스팅된 인스턴스가 어떤 클래스와 같은지 비교하여 true/false 값으로 결과값이 나옴.
그 후, 다운캐스팅하고 메소드 기능 실행
package polymorphism;

public class PolyTest {

	public static void main(String[] args) {
		FireEngine fe = new FireEngine();
		Ambulance ab = new Ambulance();

		Car c1 = fe;//업캐스팅
		Car c2 = ab;//업캐스팅

		Car cars[] = new Car[2];
		cars[0] = fe;
		cars[1] = ab;

		area(cars);
	}

	public static void area(Car c[]) {
		//불도 끄고
		//사람도 구하고
		//instanceof를 사용하여 인스턴스를 구분
		for(Car ctemp : c) {
			if(ctemp instanceof FireEngine) {
				FireEngine fea = (FireEngine) ctemp;//다운캐스팅
				fea.water();
			}
			if(ctemp instanceof Ambulance) {
				Ambulance aba = (Ambulance) ctemp;//다운캐스팅
				aba.firstAid();
			}
		}
	}//area 메소드 끝


//자동차라는 것들은...
class Car{
	String color;
	int door;

	void drive() {
		System.out.println("간다~~~");
	}

	void stop() {
		System.out.println("멈춘다!!");
	}
}

//소방차는...
class FireEngine extends Car{
	void water() {
		System.out.println("물뿌리네~");
	}
}

//구급차는...
class Ambulance extends Car{
	void firstAid() {
		System.out.println("사람을 살리네!");
	}
}
1.) instanceof 를 사용하여 인스턴스의 클래스를 구분할 경우
부모 클래스에 대한 조건을 마지막에 처리해야함.
먼저 처리할 경우 모든 인스턴스는 부모클래스의 인스턴스에 해당되기 때문에 판별이 안됨.
instanceof 로 판별시에 부모 클래스에도 포함되기 때문에 부모 클래스까지 모두 출력됨.
package polymorphism;

public class PolyTest {

	public static void main(String[] args) {

		Student st = new Student();
		Researcher rs = new Researcher();
		Professor pf = new Professor();

		System.out.println("new Student() ->\t");
		printPerson(st);
		System.out.println("new Researcher() ->\t");
		printPerson(rs);
		System.out.println("new Professor() ->\t");
		printPerson(pf);
	}


//1	자식 클래스의 인스턴스가 person 데이터형으로 들어오기 때문에 부모인스턴스와 자식 인스턴스까지 모두 해당되기 때문에 둘다 출력됨.
//	Professor은 Researcher 자손이라서 총 3개가 출력됨.
	public static void printPerson(Person p) {
		if (p instanceof Person) {
			System.out.println("Person ");
		}
		if (p instanceof Student) {
			System.out.println("Student ");
		}
		if (p instanceof Researcher) {
			System.out.println("Researcher ");
		}
		if (p instanceof Professor) {
			System.out.println("Professor ");
		}
		System.out.println();//줄바꿈용
	}
}

class Person{ }
class Student extends Person { }
class Researcher extends Person { }
class Professor extends Researcher { }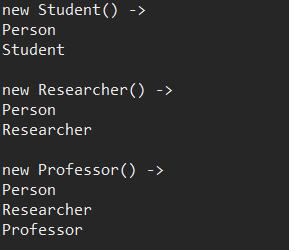
printPerson 메소드에서 if문을 else if로 바꿔봤을 때
부모 클래스에 대한 조건을 마지막에 처리해야함.
package polymorphism;

public class PolyTest {

	public static void main(String[] args) {

		Student st = new Student();
		Researcher rs = new Researcher();
		Professor pf = new Professor();

		System.out.println("new Student() ->\t");
		printPerson(st);
		System.out.println("new Researcher() ->\t");
		printPerson(rs);
		System.out.println("new Professor() ->\t");
		printPerson(pf);
	}


	//else if로 바꿔봤을 때 : 하나만 선택되기 때문에
	public static void printPerson(Person p) {
		if (p instanceof Person) {
			System.out.println("Person ");
		}
		else if (p instanceof Student) {
			System.out.println("Student ");
		}
		else if (p instanceof Researcher) {
			System.out.println("Researcher ");
		}
		else if (p instanceof Professor) {
			System.out.println("Professor ");
		}
		System.out.println();//줄바꿈용
	}
}

class Person{ }
class Student extends Person { }
class Researcher extends Person { }
class Professor extends Researcher { }
2.) Object 클래스는 모든 클래스의 조상이기 때문에 Object 참조변수는 모든 인스턴스를 저장할 수 있다!
기본 자료형(8가지)의 값도 저장할 수 있는데, 단! Wrapper 클래스를 사용하여 인스턴스로 만들어야 저장할 수 있다!
package polymorphism;

public class ObjectPolyTest {
//dto 클래스로 만든 객체를 보내거나 문자열로 만들어서 ObjectPrint로 처리할 수 있음 왜냐면 Object클래스는 모든 클래스의 조상클래스이기 때문에
	public static void main(String[] args) {
		//업캐스팅
		Integer i = new Integer(1);
		Float f = new Float(3.14f);
		String str = "abc";
		Car c1 = new Car();
		Student st = new Student();

		ObjectPrint(i);
		ObjectPrint(f);
		ObjectPrint(str);
		ObjectPrint(c1);
		ObjectPrint(st);
	}

	public static void ObjectPrint(Object obj) {//(Object타입 변수명)
		//다운캐스팅
		if(obj instanceof Integer) {
			System.out.println("정수 : " + (Integer)obj);
		}
		else if(obj instanceof Float) {
			System.out.println("실수 : " + (Float)obj);
		}
		else if(obj instanceof String) {
			System.out.println("문자열 : " + (String)obj);
		}
		else if(obj instanceof Car) {
			System.out.println("자동차 : " + (Car)obj);
		}
		else if(obj instanceof Student) {
			System.out.println("학생 : " + (Student)obj);
		}
	}

}//클래스 끝
4. 추상화(Abstract)
- 미완성 클래스를 작성하는 것.
- 개념을 정의한다.
- 기본(부모/조상) 클래스를 설계할 때 메소드의 이름있는 부분(선언부)만 정의하는 것.
1.) 추상 클래스(Abstract class)
- 멤버 중에 하나라도 추상 메소드가 있으면 추상 클래스임.
- 추상 클래스 안에는 추상 메소드가 없을 수도 있음.
- 이경우 추상 클래스로 만들 필요가 없음.
2.) 추상 메소드(Abstract method) - 미완성 메소드
- 선언부만 정의된 메소드. 추상 메소드가 있으면 그 클래스는 반드시 추상 클래스여야 함.
- 추상 메소드는 반드시 상속 받은 하위 클래스에서 내용을 정의해야 함.(또는 하위 클래스도 추상 클래스가 되어야 함.)
package AbstractPkg;

public class AbstractTest1 {

   public static void main(String[] args) {
      // TODO Auto-generated method stub
      // 추상 클래스는 인스턴스를 만들 수 없다.
      // Abs abs = new Abs();
      // 대신 인스턴스를 만들 때 추상 메소드를 정의하면 가능하다.
      Abs abs2 = new Abs() {

         @Override
         public void absMethod() {
            System.out.println(1);
         }
         //재정의해준거
      };

      Abs abs3 = new Abs() {

         @Override
         public void absMethod() {
            System.out.println(2);
         }
      };

      abs2.absMethod();
      abs3.absMethod();
      //독자적인 자기만의 아이덴티티가 있음

      ChildAbs abs4 = new ChildAbs();
      ChildAbs abs5 = new ChildAbs();
      abs4.absMethod();
      abs5.absMethod();
      //하나의 인스턴스에 기능을 부여해서 출력하기 때문에 같은 결과가 나옴
   }

}


abstract class Abs{
   public abstract void absMethod();
}


class ChildAbs extends Abs {

   @Override
   public void absMethod() {
      // 부모클래스의 추상 메소드를 반드시 정의해야 함.
      // 이 메소드에서 실질적으로 처리해야 할 작업을 작성.
      System.out.println(5);

   }

   //추상 사용 => 작업팀내의 표준화(정해진 규칙대로 진행하는거)
   //ex.두개의 클래스를 따로따로 두 사람에게 작업을 시킬때
}
5. 인터페이스 (Interface)
- 추상화 정도가 깊은 클래스.
- 모든 메소드는 추상메소드임.
- 변수는 없다.(변수 선언 불가) -> 상수는 들어갈 수 있음.(상수로 선언후 초기화 해주면 가능)
- 완전 미완성이기 때문에 인스턴스를 만들 수 없음.
1.) 인터페이스를 상속받아서 작성하는 클래스의 작성 형식
class 클래스명 implements 인터페이스명 { }
package InterfacePkg;

public interface ParentInterface {
	//필드 == 상수
	public static final int ci = 10;
	int ci2 = 200;//public static final이 앞에 생략 되어 있다

	//메소드 == 추상 메소드
	public abstract void iMethod1();//추상 메소드라서 안에 내용을 정의하지 않는다
	void iMethod2();//앞에 public abstract 이 생략 되어 있음.

}
인터페이스에 선언된 모든 메소드를 반드시 재정의(override) 해야 한다.
재정의하지 않을 경우라도(반드시 해야할 필요는 없음) 선언부와 { }는 작성해야 함. 예)InterfaceClass 처럼..
인터페이스를 상속받은 클래스에 새로운 멤버(변수, 메소드)를 추가할 수 있다.
package InterfacePkg;

public class InterfaceClass implements ParentInterface {//상속받는다 X 구현한다 O

	@Override
	public void iMethod1() {

	}

	@Override
	public void iMethod2() {

	}

}
상속은 클래스를 계층화하여 관리하는데 좋은 개념.
인터페이스는 클래스를 그룹화하여 관리하는데 좋은 개념.
'JAVA' 카테고리의 다른 글
| JAVA(23) - 실습 <제품 관리프로그램> /응용실습 - <데이트 관리프로그램> (0) | 2020.04.11 |
|---|---|
| JAVA(22) - 예외처리/Exception Handling/try/catch/finally/throw/ throws (0) | 2020.04.07 |
| JAVA(20) - 캡슐화(정보 은닉)/상속/상속의 장점/상속의 계층화/상속과 포함관계를 모두 사용한 새로운 클래스 작성/클래스 상속 받는 방법/상속 실습 프로젝트 만들어보기/Override (오버라이드)/.. (0) | 2020.03.27 |
| JAVA(19) - 생성자/기본 생성자/메소드 오버로딩/Method Overloading/ (0) | 2020.03.18 |
| JAVA(18) - 콜백함수/(STATIC/인스턴스)메소드에서 호출 (0) | 2020.03.17 |


